Cozy Dirt Cups: The Sweet Childhood Treat That Brings Back Memories
Ah, Dirt Cups! Just the mention of them brings a warm, nostalgic feeling straight to my heart. I remember making these delightful, creamy desserts with my family during sunny afternoons, while the fragrant scent of spring flowers wafted through the open windows. There’s something so comforting about getting your hands a little messy, creating a delicious treat that’s both fun to make and even more fun to eat. As we layered chocolate pudding and crushed Oreos in colorful cups, laughter filled the kitchen, and the anticipation of indulging in our masterpiece made every moment sweeter.
These easy, no-bake Dirt Cups are not just delightful treats for kids. They’re perfect for any gathering, from backyard barbecues to cozy family get-togethers. So, if you’re dreaming of a creamy, chocolatey dessert that will bring smiles to all ages, you’ve come to the right place! This is one you’ll definitely want to pin for later!
Why You’ll Love This Recipe
Quick and Easy: With just a few ingredients and minimal preparation time, you’ll have a delightful dessert in no time.
No-Bake Fun: This is a wonderful recipe to make on a warm day when you don’t want to heat up the kitchen.
Family-Friendly: Kids will love the interactive aspect of layering and decorating their cups!
Crowd-Pleasing: Whether it’s a birthday party or a casual get-together, Dirt Cups are sure to impress and satisfy.
Customizable Layers: You can switch up the toppings or add unique flavors for an easy weeknight dessert that feels special.
What You’ll Need
Gather these simple ingredients to whip up your very own Dirt Cups:
- 1 package of instant chocolate pudding
- 2 cups of milk
- 1 package of Oreos, crushed
- Gummy worms (for garnish)
- Whipped cream (optional)
Let’s Make It Together
In a mixing bowl, combine the instant chocolate pudding and milk; whisk until smooth, feeling the creamy mixture come together as you mix.
Dive into your cups or bowls, and layer the velvety chocolate pudding at the bottom. Let it settle like the comforting start to a childhood adventure.
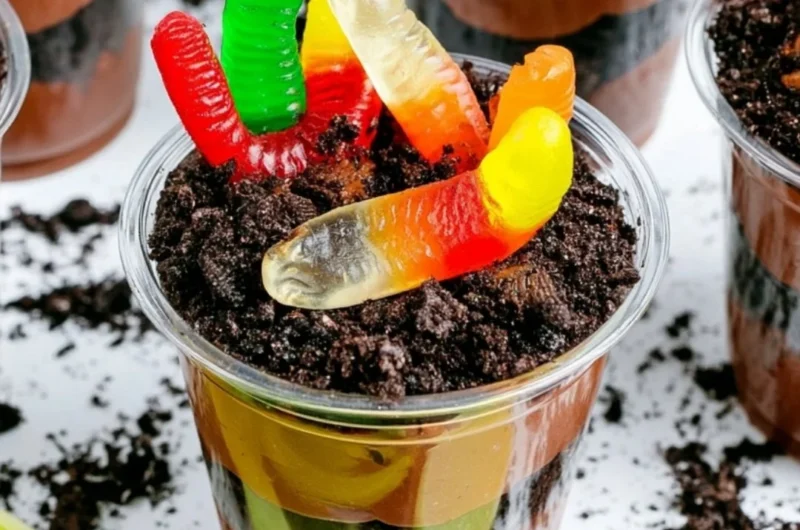
Sprinkle a generous layer of crushed Oreos on top of the pudding, resembling the rich, dark soil in a cozy garden.
Repeat the layers until your cups are filled to the brim with pudding and Oreos—creating a delicious, earthy masterpiece.
If desired, top with a dollop of whipped cream, feeling the rich texture right before garnishing with colorful gummy worms.
Serve immediately for that fresh taste, or chill in the refrigerator until it’s time for dessert, giving the flavors a bit of time to mingle.
Fun Ways to Customize It
Chocolate Mint Delight: Add a splash of mint extract to your pudding mix for a refreshing twist. Top with crushed mint Oreos for added flavor!
Vanilla Dream: Swap out the chocolate pudding for instant vanilla pudding and top with fresh berries for a delightful burst of color and flavor.
Nutty Addition: Mix in some chopped nuts or a drizzle of caramel between the layers for a crunchy aspect that complements the creaminess.
Rainbow Worms: Use different colored gummy candies or even sprinkles on top to add a fun, festive flair, perfect for celebrations or holidays!
Chef Emma’s Helpful Tips
Make-Ahead Magic: You can prepare the pudding and crush the Oreos a day in advance. Just assemble them right before serving for the freshest taste.
Ingredient Swaps: Feel free to substitute the Oreos with chocolate graham crackers for a lighter crunch, or even go gluten-free with gluten-free cookies.
Personalized Portions: Consider using mini mason jars for an adorable presentation at parties—they also double as sweet favors for guests!
Storing Leftovers: If you happen to have any leftovers (which is rare!), cover and store them in the refrigerator for up to 2 days.
What’s Inside – Nutrition Breakdown
- Serving Size: 1 cup
- Calories: 320
- Carbohydrates: 38g
- Sugar: 22g
- Fat: 15g
- Protein: 4g
- Sodium: 350mg
Frequently Asked Questions
Can I make this ahead?
Absolutely! You can prepare the pudding and crushed Oreos a day before and layer them right before serving.
Can I use different ingredients?
Yes! Feel free to get creative with your layers and toppings. Vanilla pudding, fresh fruit, or even different cookie types can give you new flavors.
How do I store leftovers?
Store any leftovers in an airtight container in the fridge. They should last for up to 2 days.
How long does it last?
Dirt Cups are best enjoyed fresh but can be kept for about 2 days in the refrigerator, tightly covered.
Cozy Closing Note
There’s something undeniably magical about enjoying a decadent, layered dessert that evokes sweet childhood memories. Dirt Cups are not just a treat; they’re an experience that brings families closer together, creating moments to cherish. Whether it’s a lovely spring day or a winter evening spent indoors, these sweet cups are the perfect addition to any occasion. So, save this Dirt Cups recipe to your dessert board so it’s ready when you need a cozy sweet treat!